All You Need To Know About The DSTV Remote, Resetting, And Programming
It is reasonable to assume that a significant portion, approximately 60%, of the Ghanaian population possesses at least one DSTV decoder in their household.
Consequently, these households are equipped with at least one DSTV remote control.
In a previous article, we delved into troubleshooting common issues affecting the remote control and provided solutions.
Building upon that, it is essential to explore additional aspects of the DSTV remote to optimize its functionality, ensuring an enhanced experience of the diverse entertainment offerings associated with owning a DSTV subscription.
This article aims to shed light on often overlooked features and practices related to the TV remote.
By delving into these aspects, readers can glean valuable insights to maximize their enjoyment of the extensive entertainment options provided by DSTV.
Without further ado, let’s delve into the intricacies of the DSTV remote to empower users with a comprehensive understanding.
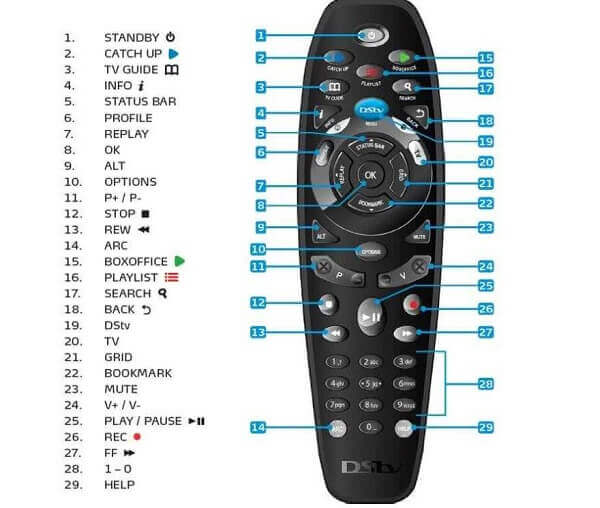
Connecting Your DSTV Remote To The Decoder
If you’ve recently acquired a DSTV decoder and managed the installation independently, you may find yourself well-versed in setting up the satellite dish but uncertain about connecting the remote. Let’s explore the process of connecting the remote to the decoder.
The connection between the remote and the decoder involves selecting one of three options: TV1, TV2, or TV3. This choice is pivotal, especially when troubleshooting an unresponsive remote.
To adapt the DSTV Explora remote to specific needs, it’s crucial to understand how to switch between TV1, TV2, or TV3 settings.
This flexibility allows users to configure the remote according to the specific requirements of the moment.
Whether it’s TV1, TV2, or TV3, the ability to adjust the remote settings ensures seamless functionality and addresses any issues related to unresponsiveness.
Let’s delve into the steps to make this essential configuration for an optimal user experience.
How To Set The Remote
If you do not know how to set the remote under either of the above-mentioned TV settings, here is how to go about it.
All you have to do is to press and hold the needed button for about three seconds until you see the green light blinking on the designated TV. For example, on TV1.
If you happen to see that the green light is blinking below the ‘Back’ button, then it means that the remote is set to TV2 mode.
Pressing and holding the ‘Back’ button for three seconds. The green light will then blink on TV2.
If you wish to set the remote to work under TV3, the procedure is quite simple as well but requires a bit more than the earlier ones.
You will have to press and hold the ‘back’ button and the ‘I’ button together for three seconds.
DSTV Troubleshooting Colors For Remote
These are the various colors for troubleshooting the remote of the DSTV decoder. Here are the various colors.
- Mode 1, TV2- red
- Mode 2, TV2- green
Setting Up The DSTV A7 Remote
The programmable nature of the DSTV remote enhances its usability with the decoder, allowing users to effortlessly switch the remote between different decoders.
However, there are instances where errors during the setting process can result in the remote functioning incorrectly, akin to a broken remote.
In such cases, it becomes necessary to reset the remote to its default settings, undoing any inadvertent changes made during the programming process. Resetting the programming on the A7 remote serves as an effective solution, systematically clearing out any errors and restoring the remote to its initial, default configuration.
This simple yet crucial step ensures the smooth and error-free operation of the DSTV remote, contributing to a hassle-free and enjoyable viewing experience.
Let’s explore the steps involved in resetting the programming on the A7 remote for optimal functionality.
How To Reset The DSTV Remote
Since you now know that you need to reset the DSTV remote before you can correct the mistakes that have accumulated on it, you will have to do exactly that.
Let us look at the ways through which you can reset the remote.
- Hold down the ARC and the standby button together for about three seconds. The remote will change to an amber color while you are doing this
- While you are still pressing the ARC button, release the standby button
- Now dial in 9499 while you are still pressing the ARC button. There will be three green blinks of the light
- Now, just release the ARC button and the process will be complete
Setting Up DSTV Link
Here is how to set up the link between your remote and the TV.
- Press on the menu button
- Choose advanced options
- Enter the PIN as 9499
- Now, select equipment setup
- Choose TV link/ auxiliary in option 3
- Select ‘on’
- Now save the option you just chose
- And the press ‘ok’ to finish
Conclusion
With the provided insights, configuring your DSTV remote becomes a straightforward task that you can accomplish independently.
By understanding the process of connecting the remote to the decoder, switching between TV settings, and resetting the remote when necessary, you empower yourself to manage these tasks without the need for expert assistance.
This self-reliance ensures that you can enjoy your DSTV experience with confidence, knowing that you have the know-how to troubleshoot and optimize the functionality of your remote.
Should you encounter any challenges along the way, these guidelines serve as a reliable resource to navigate and resolve potential issues. Happy viewing!